About Me

My photo
Hi I'm Clare, I live in the South West of England in the seaside town of Torquay. I adore playing with inks, paints and generally getting messy. It is the calm place which fits in between my hectic life whilst working as an outreach support worker, looking after my son, daughter, foster son and hubby. Not forgetting our gorgeous springer spaniel, Suzi.

Thursday 15 December 2016

Winter Warmers

Good morning all,  just a quick post to remind you there is still time to take part in this months  Mixed Media Monthly  Challenge.  Pop over to the the blog  to check out the rules and submit your entries and  as it is the season of goodwill there are some fabulous prizes up for grabs so be sure to enter your merry makes!

Eileen Hull, our sponsor for this month,  very kindly provided us with some die cut boxes.  For my second project I visualised the delightful tray full of seasonal treats.


In this  design  I used  Decoart fluids (turquoise) once again but this time I chose to work with the Decoart crackle paste.  I went for a mega crackle and applied weathered wood before applying a layer of the paste.  Once dry  I painted on a layer of antiquing cream  and rubbed back to reveal my frosty offering.  I trimmed the box with some die cut snow flakes and some sparkly stickers.  I couldn't resist adding some stickles to give some more twinkle to the project.  The title was applied and the little box was filled with sachets of  hot chocolate and festive treats.


Thank you for taking the time to stop by.  It is such a busy time of year so I really do appreciate it.  I'm really looking forward to the holidays (lots of crafty time) and I'll  be back soon to share some more craftyness!

Crafty hugs,

Clare X X X 


Thursday 1 December 2016

Mixed Media Monthly Challenge #31. Merry & Bright

Good morning all,  I'm bringing with me some good cheer today and sharing with you the latest theme for the  Mixed Media Monthly Challenge


Our sponsor this month is Eileen Hull and this months lucky winner will be receiving one of Eileen's fantastic dies.  Our Design team member Lisa is also on Eileen's design team so be sure to pop over to the MMMC BLOG to check out the makes Lisa and the rest of our talented team!

  I painted my die cut box with a layer of Decoart media fluid Paynes Grey and added a layer of weathered wood medium.   
                                                                
Over the top of the weathered wood medium I added some Decoart crackle paint,  waited for it to dry and watching the crackles appear.  Once dried I applied a coloured layer of quinacradone gold and red.  
  Through a TCW stencil I sponged on some Decoart metalic gold.  I splattered on some white paint to create a snowy atmosphere.  Once dry I constructed the box with double sided tape.  I had already prepared some dictionary pages using the Decoart reds and a Tim Holtz stencil.  I applied these to the bottom of my box using Matt medium.  Using Canvas Corp papers I cut out some triangles to turn into christmas trees.  I added some liquid pearls to my little trees, some ribbon and a sentiment to the lid of my box.  


Well that's one of my projects for this months challenge, now it's your turn!  Head over to the blog to capture some more inspiration, check out the rules and submit your entries.

Happy christmas crafting.

Hugs,
Clare X X X   

Sunday 20 November 2016

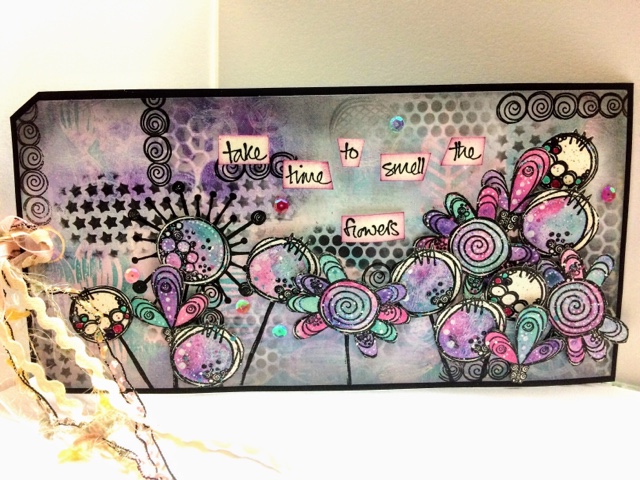
Take time to smell the flowers


Well it's been far too long since I wrote a blog post for myself.  I love crafting, painting and generally just getting into a painty inky state but usually I am governed by a theme for a challenge so this project was all about me letting loose, having a play and experimenting.  Tonight I opened up a packet of ginormous tags and began my personal challenge of filling the blank card stock with colour and imagery.


I cracked open my gelli plate and began brayering with Paperartsy fresco  paints.  Using orchid, Bora Bora, Egg plant, sherbet and a handful of stencils I began to create my colourful layers onto the tag.  I even managed to make full use of the left overs on the plate and pulled some prints for future use.  


With a TCW stencil and some black soot distress ink I blended on some stars, circles and hexagons.  I also blended around the edge of the tag.


Onto some watercolour paper I stamped the images designed by Tracy Scott for Paperartsy and using the watered down colours Bora Bora, Egg plant & Orchid I painted the blooms.  Once dry I splattered them with some white and again with my chosen colour palette.  I fussy cut the flowers ready to assemble to the tag.

I attached my frenzy of flowers to my tag adding some stickles here and there along with a few sequins.  

Thank you for stopping by today.  I hope you have enjoyed my post?  If you have feel free to leave a comment below and if you fancy having a peep and what I get upto next why not click on the follow link at the top of the page.

Happy crafting,

Clare X X X 


Tuesday 1 November 2016

Mixed Media Monthly Challenge #30 colour inspiration


You Good morning all!  1st of the month again, isn't this year flying by?  Here is another fabulous challenge for you from Mixed Media Monthly Challenge, this month challenge is colour.


Our Guest Designer this month is Suzanne Czosek and the challenge has been sponsered by Funkie Junkie Boutique, they have put together a fabulous prize package together for this months challenge.

So let me share with you how I made this months project.  I decided that this fo this months challenge I was going to work in my small art journal. My starting point was adding a rough coat of gesso to the pages.   I wanted to use all of the colours from the pallet so with Paperartsy fresco paints Slate & Toad hall I loaded them onto my pages using a brayer.  


Using a brayer again, I added some melted chocolate Dylusions.  With some stencils and white paint I went over my brayered paint.


Brayering again with buff titanium and a small amount of coral/ orange I then added some more stencilling.


Using Paperartsy stamps by Tracey Scott I stamped some background stamping in white.


Using my mini gelli plate and some card I printed some orange backgrounds,  these were going to be my flowers.


Once  I had stamped my flowers onto the page and cut out the orange buds I  decided that the orange blooms  looked a little lost on such a bold page so I decided to bring in some turqoise to lift the main images forward.  On some card, using Bora Bora I made some more flowers and stamped some of the bumps.


I added some doodles to my journal page and with black ink I stamped Hazy Days as the background I had created reminded me of one of those beautiful autumnal hazy days packed with rich,  earthy color. 


To some of the blooms and clouds I added some glossy accents to give a little dimension and also some pearly dots.  


Now it's your turn,  head over to the Mixed Media Monthly Challenge for some more incredible inspiration from the rest of the team,  read the rules and submit your entry.  Have fun playing with this months colour challenge!

Crafty hugs,

Clare X X X 

Monday 17 October 2016

Mixed Media Monthly Challenge Mood Board

Hello all, I hope you have all had a fantastic weekend?  I have just updated my blog to remind you that there is still plenty of time for you to join in with this months challenge

There is a fabulous prize of $30 from Stampotique to spend so head over to the MMMC blog for more inspiration and submit your entry.  Now although our mood board has a spooky theme there is a fantastic array of colour which is what I have used for today's project.


I started off by applying white acrylic paint through a variety of stencils.  Once this had dried I applied festive berries, wild honey and peacock feathers distress inks over top, I love how the acrylic pops through the distress inks like magic!


After I'd finished with the bright distress inks I blended around the edges with pumice stone distress inks to add a little more depth.  


Onto some water colour card I stamped Stampotique's Birdy up, by Kira Nichols and coloured with Neocolour II crayons and a water brush.  I added some dots to the birds using a White posca pen.  I penned directly onto the card (after a practise) a line for the birdies to perch and finally added my feathered friends to their positions.

Now it's your turn!  I can't wait to see your entry for this months challenge.  See you soon.


Crafty hugs,

Clare X X X


Saturday 1 October 2016

Fall Ball 2016

You You Hi folks it's the first of the month so that can only mean one thing.......Mixed Media Monthly Challenge new challenge!  This months challenge is a mood board


You've got it,  it's a Halloween theme and our sponsors for this month are none other than Stampotique Originals.  They are giving our winner $30 gift certificate !


So to start you off with a little inspiration here is my make for this months challenge.  I wanted my
journal pages to have a photo album feel.  Using Decoart paints I created a master board with stencils and Kate Cranes doodle cube stamp.  I also made a journal page using the same paints, slightly different stencils.

I wasn't happy with my original page so I saved this for a different project.


I chopped up my master board into squares and layered them onto white card to give the appearance of Polaroid photos.


I customised some photo corners using the co-ordinating paints and a brayer.


The Stampotique characters were stamped onto watercoloured card and coloured with Neocolour II crayons.  I fussy cut them out and placed them onto the Polaroid.


I added some shading behind the characters with a black Neocolour II crayon and water brush.


Now with the colours that I had used  there wasn't a huge Halloween influence so I decided to document what they got up to at the Fall Ball.   I typed this up,  printed out and arranged in my journal.  


I added some doodles to my pages with a white and black pen.


My Stampotique photo album page was complete!  I can't even begin to tell you how much fun I had planning and making this project!

Now it's your turn!  Head over to the Mixed Media Monthly challenge, check out some more fabulous inspiration and submit your entries!

Crafty hugs,

Clare X X X 

Thursday 15 September 2016

Love, Discover, Embrace

Good morning all, I'm here again today with another post for Mixed Media Monthly Challenge!  Our more than generous sponsers, Canvas Corp, sent me an abundance of crafting goodies I was able to come up with another mixed media piece.  
  I have included some photo steps for this piece but so far into making this I got lost in the moment and forgot about the photos!  

I started off by layering some Canvas Corp papers onto a canvas board.  Once dried I roughly scraped some gesso over the top and stamped into it to leave lots of texture.


Once the gesso had dried I added some texture paste through a stencil. 
 Using the fabulous Tattered Angels  glimmer mists, supplied by Canvas Corp,  I spritzed over the canvas board leaving various shades of shimmer behind.

Whilst waiting for my shimmering board to dry I pieced together some more of the gorgeous papers to prepare for another piece to place on my canvas.

 Again I spritzed with the bronze glimmer mist and cut out my shimmering heart.
Here is where the photo stages ceased so I'll talk you through the rest.  I took my heart and using the sewing machine I sewed some random lines, with various patterns, over the heart.  I also cut out a couple of smaller hearts from to accompany the large heart. I layered the large heart with burlap and using a hot glue gun, I applied this to the canvas along with the two smaller hearts.  I applied some words and added some background stamping in white ink.  I also added some white dotty doodles.  


 There is still plenty of time for you to submit your  rustic entry for this months Mixed Media Monthly Challenge.  There is a voucher worth $25 from Canvas Corp up for grabs!  Pop over to the blog for some more inspiration and show us your creations.   Crafty Hugs, Clare X X X     

Thursday 1 September 2016

Mixed Media Monthly Challenge - Rustic

Morning all, I'm here to share with you this months theme for The Mixed Media Monthly Challenge!
Our theme this month is 'Rustic'.

Our guest designer this month is Lynne Forsythe and our sponsor is Canvas Corp Brands.  They will be offering a gift certificate of $25 dollars.  They supply some amazingly gorgeous products and you certainly will be spoilt for choice!

Well I really did have a super selection of goodies to work with!  Once I'd received my parcel I spread the contents over the table and my planning began.


Such an array of gorgeous crafting goodies what was a girl to do?  I started off by looking at the seven gypsies ATC drawer.  I painted  it with the Tattered Angles naturally aged paint system, I really love the effect that these paints and sprays acheive and they really do have endless possibilities.


I decided that my ATC drawer was to be a more of a configuration box.  After using the paints I lined the insides of the drawers using the delicious papers that Canvas Corp had provided.


I then had to think about what was going to sit on the miniature shelves.  I absolutely love painting houses, so that was going to be the theme.  Using the small wooden canvas stretchers you find attached to canvases, I glued them together to form the mini buildings, I gave them a coat of gesso before spraying some with the Tattered Angels chocolate glimmer mist and painting some with chalk paint.


I added details to the houses using the paper scraps from lining the drawers so that the houses co-ordinated with the drawer.


I constructed a drawer to slot inside the bottom opening and routed around in my treasure box to find a mini handle and I rummaged around in my husband's garage to find some mini handles to attach as legs.  I die cut some flowers from the canvas panels and added buttons to finish.  Tying some strings and cotton tapes (died with glimmer mists) I tied these to the handle on top of the drawer.


So there you have it, my attempt at a mini  Rustic configuration piece.  Now it's your turn!   I look forward to seeing what you make for this months challenge.  

Pop over to the Mixed Media Monthly Challenge website to see the rest of the teams amazing creations and submit your own entry.

Crafty hugs,

Clare X X X 


Monday 22 August 2016

Master board step by step with Dylusion Paints

Hi folks, I just thought I would do a quick blog for my page today to show you how I come up with my master boards.  I don't think that there are any hard and fast rules to this and everyone has their different ways of creating.  I have made a step by step in photos to show how I built up the layers on this particular board.


I started off with white linen Dylusions paint and brayered onto my white card.


Using London blue and the brayer I repeated.  It doesn't look much at the moment,  I promise when you add more layers the magic begins!


Brayering again now with white.


A change of colour.  Using after midnight.


Again I brayer over the darker blue to knock it back.


Time for some stencils, using white linen I sponged through the Dylusions stencils.  I like to put my stencils in three different areas but that is dependant on size, style and pattern.


Now for some dots using a Dylusions stencil, I love dots, circles, splodges all shapes and sizes, I love em!


Now I've added in some stripes still working in three areas and placing my stencil in different directions.


See I told you I love circles!  Using my chosen colours placing white over the darker areas and darker shades over the lighter areas.


Coming back with the White, using Tim Holtz splotches stencil.  I broke my rule of three on this I love the effect the rough edged circles create over the darker colours.


Time for some stamping!  Using stamps from the Tim Holtz set 'District Warehouse'  I stamped in blue and white pigment ink.


So there you have it, my master board!  Like I said there are no rules just go with what you feel and watch your piece grow!


Here are a couple of very different makes using this master board.  The details and links to the materials I used are over at A Sprinkle  of imagination.


Thanks for stopping by.  I love to hear your comments, you can leave these below or maybe you would like to follow my blog for regular updates?

Happy crafting,

Hugs,
Clare X X X