Hi I'm Clare, I live in the South West of England in the seaside town of Torquay. I adore playing with inks, paints and generally getting messy. It is the calm place which fits in between my hectic life whilst working as an outreach support worker, looking after my son, daughter, foster son and hubby. Not forgetting our gorgeous springer spaniel, Suzi.
Hi guys I'm back with a little mid month inspiration for you. The Mixed Media Monthly Challenge theme this month is Sweet Inspiration! Our Sponsours this month are Stampendous, so to be in with a chance of a $25 gift certificate it's time to get crafty!
Using Dylusion paints, Bubble Gum, Lemon Zest & Vibrant turquoise, I scraped the paints over the
tag, drying in between changing colours. I knocked back some areas with white linen. Time for some mark making! With the edge of an old gift card I added in some lines, using an old bottle top I stamped on some circles. Using the flowers from the Whisper Fly stamp set I stamped into the background.
I stamped the cute bumble bee from the Stampendous Whisper Fly set and coloured Neocolour II crayons. Completed with some sequins and twine my little valentine tag is ready to go.
Good morning all! A new month, a new challenge. Love is in the air this month as we ask you to search for some Sweet Inspiration with the Mixed Media Monthly Challenge.
Our sponsor this month is Stampendous and our special guest designer this month is Fran Seiford. Fran is the founder of Stampendous and has also designed an abundance of stunning stamps! Stampendous are offering you a chance to win a $25 gift certificate for this months challenge.
So looking at the selection of goodies I had to work with I knew that it wouldn't be too tricky to come up with something as sweet as candy.
I started of by applying the dream weaver glossy stencil paste through the stencil and spinning some of the uber fine micro glitter over the wet paste. I set aside to dry to use to embellish my card.
Using Paperartsy fresco chalk paints I layered up my card. Using the circle shape from the gelli printing shape set I started to print different coloured circles onto the card changing the pattern after I'd ran out of colour on the circle.
Once I was happy with my gelli print I decided which part I wanted to use and with some die cutting, I cut out a heart from the centre of the card. I layered onto black card. I then proceeded to add some doodling using a white Posca pen.
I stamped the image onto watercolour paper and coloured using neo-colour II water colour crayons. I cut out leaving a slight white edge around the sweet little fairy and balloons.
I cut out some candy circles from the glittered, rainbow card, applied a sweet sentiment and attached to the card along with the floating fairy.
That's my sweet inspiration for you, now it's your turn. Head over to the Mixed Media Monthly Challenge blog to check out some more sweet inspiration, read the rules and submit your entry for the chance to win a $25 gift certificate.
Thank you for stopping by today, I look forward to seeing all of your Sweet Inspiration creations.
Exciting times indeed! Now, it is no secret that I have long been an admirer of Tracy Scott's journaling and art, so when Tracy contacted me and asked me to be one of her wingmen for the launch of her new stamps and paints with Paperartsy I was 100% jumping for joy! How on earth could I not be excited about being involved in such an opportunity?
(
)
Remember to visit the Paperartsy blog to see more fabulous creations using Tracy's stamps and check out the amazing new releases that have been happening over January. Follow my blog page and leave a comment and you could be in with a chance of winning a set of Tracy's new stencils!
So where to start? Leandra from Paperartsy generously supplied me with an abundance of new colours, gorgeous stamps and stencils to get crafty with. Come with me whilst I share my creative Paperartsy journey with these glorious new products!
First of all I started with a piece of craft card and with and old gift card I spread on some Cherry Red Paperartsy Fresco chalk paint.
With a brayer, I lightly went over the top using the same Chalk coloured paint to knock back the red.
I repeated this with Carribean Sea and continued to build my layers using the paints and the stencils
until I was happy with my masterboard. I ended up making a couple like this.
I stamped on to one of the boards with the large bloom from set ETS06 and heat embossed.
I cut the flower out, I also cut out the centre, re-stamped the image onto acetate, coloured in the dotty centre with a white paint pen and replaced the centre of the bloom.
Now that all my bits and pieces were made I was able to assemble and complete my Funky Flower!
Onto my next make, with all of the new colours from Tracy's new release, I went on to make a masterboard. Using the stencil PS052 I added Carribean Sea, bumped the image and went over with Chalk Paperartsy Fresco paint.
I stamped again onto a spare piece of the masterboard, heat embossed and cut out a chosen three of the petals and the centre of the flower, leaving it in one piece and layering onto the red bloom.
I Stamped the flower stalk onto the main card and applied the colourful bloom, slightly raised from the main card.
For my third project I blended together, on some Paperartsy smoothy card, Prawn and Butternut Fresco paint.
I cut the A4 sheet down in size to create my tag. I stencilled with stencil PS054 with Chalk Fresco paint and also added some white & pink stamping.
I now added lots of little details using the smaller circular stamps and collaged them onto my tag. I made the main flower out of a couple of different layers using the colours I had used for the background.
I added white doodles, stickles and pearly dots to the tag for a bit of sparkle!
I cut out my tag shape and mounted onto black card which made the fabulous images pop out!
These are a selected few of the projects that I have shared with you tonight. If you would like to see some more creations using these delicious stamps, check out my Instagram page clarecraftsalot.
Remember to follow and comment to be in with a chance to win this brand new set of Paperartsy, Tracy Scott Stencils. I will do the draw on the 29th of January and announce the lucky winner on my blog page.
Happy new year to you all! It's the start of a brand new year and I'm filled with plenty of optimism that it is going to be a very crafty one indeed. There is much excitement as we welcome a new member Lynne Erskine Forsythe to the team. It's the first of the month so to set you all off here is the first challenge for Mixed Media Monthly challenge.
Our very generous sponsors, Stencil Girl, sent me 3 fabulous stencils to play with. Our guest designer is non other than Mary Beth Shaw so be sure to pop over to the Mixed Media Monthly Challenge blog to see what wonderful creations Mary and the rest of our amazing team have made. There will be a $25 gift certificate for our lucky winner, just think of the fun to be had with those fabulous stencils!
Stencils are versatile crafty tools with oodles of uses the hardest part of this challenge was deciding which way to use them.
I chose to get out the paints along with the gelli plate. Selected my colour pallet using a variety of paints which included a metalic gold and set off printing lots and lots of yummy prints ready to collage onto a canvas.
I selected the prints that I was going to use and applied them to the canvas using Matt medium.
Once my collage pieces were glued down I knocked back the entire piece with some white paint before spritz in with some vibrant turquoise Dylusions ink. From the flowery prints I die cut 3 circles and collages them on with matt medium.
I added some shading to the circles and the collage pieces using a black neocolourII crayon and highlights with some white and gold metalic paint.
Finally I added some texture paste through the flowery stencil along with some treasured gold to give a metallic finish.
So now I'm handing over to you! Time to put a stencil on it and head over to the MMMC blog to check out the rules and submit your entries.
Good morning all, just a quick post to remind you there is still time to take part in this months Mixed Media Monthly Challenge. Pop over to the the blog to check out the rules and submit your entries and as it is the season of goodwill there are some fabulous prizes up for grabs so be sure to enter your merry makes!
Eileen Hull, our sponsor for this month, very kindly provided us with some die cut boxes. For my second project I visualised the delightful tray full of seasonal treats.
In this design I used Decoart fluids (turquoise) once again but this time I chose to work with the Decoart crackle paste. I went for a mega crackle and applied weathered wood before applying a layer of the paste. Once dry I painted on a layer of antiquing cream and rubbed back to reveal my frosty offering. I trimmed the box with some die cut snow flakes and some sparkly stickers. I couldn't resist adding some stickles to give some more twinkle to the project. The title was applied and the little box was filled with sachets of hot chocolate and festive treats.
Thank you for taking the time to stop by. It is such a busy time of year so I really do appreciate it. I'm really looking forward to the holidays (lots of crafty time) and I'll be back soon to share some more craftyness!
Good morning all, I'm bringing with me some good cheer today and sharing with you the latest theme for the Mixed Media Monthly Challenge
Our sponsor this month is Eileen Hull and this months lucky winner will be receiving one of Eileen's fantastic dies. Our Design team member Lisa is also on Eileen's design team so be sure to pop over to the MMMC BLOG to check out the makes Lisa and the rest of our talented team!
I painted my die cut box with a layer of Decoart media fluid Paynes Grey and added a layer of weathered wood medium.
Over the top of the weathered wood medium I added some Decoart crackle paint, waited for it to dry and watching the crackles appear. Once dried I applied a coloured layer of quinacradone gold and red.
Through a TCW stencil I sponged on some Decoart metalic gold. I splattered on some white paint to create a snowy atmosphere. Once dry I constructed the box with double sided tape. I had already prepared some dictionary pages using the Decoart reds and a Tim Holtz stencil. I applied these to the bottom of my box using Matt medium. Using Canvas Corp papers I cut out some triangles to turn into christmas trees. I added some liquid pearls to my little trees, some ribbon and a sentiment to the lid of my box.
Well that's one of my projects for this months challenge, now it's your turn! Head over to the blog to capture some more inspiration, check out the rules and submit your entries.
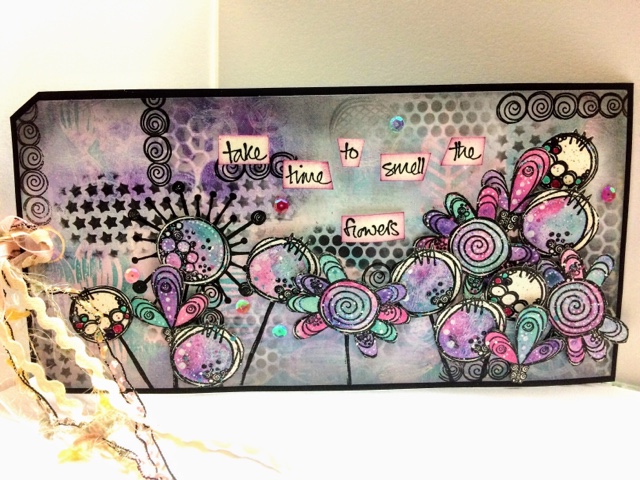
Well it's been far too long since I wrote a blog post for myself. I love crafting, painting and generally just getting into a painty inky state but usually I am governed by a theme for a challenge so this project was all about me letting loose, having a play and experimenting. Tonight I opened up a packet of ginormous tags and began my personal challenge of filling the blank card stock with colour and imagery.
I cracked open my gelli plate and began brayering with Paperartsy fresco paints. Using orchid, Bora Bora, Egg plant, sherbet and a handful of stencils I began to create my colourful layers onto the tag. I even managed to make full use of the left overs on the plate and pulled some prints for future use.
With a TCW stencil and some black soot distress ink I blended on some stars, circles and hexagons. I also blended around the edge of the tag.
Onto some watercolour paper I stamped the images designed by Tracy Scott for Paperartsy and using the watered down colours Bora Bora, Egg plant & Orchid I painted the blooms. Once dry I splattered them with some white and again with my chosen colour palette. I fussy cut the flowers ready to assemble to the tag.
I attached my frenzy of flowers to my tag adding some stickles here and there along with a few sequins.
Thank you for stopping by today. I hope you have enjoyed my post? If you have feel free to leave a comment below and if you fancy having a peep and what I get upto next why not click on the follow link at the top of the page.




 I painted my die cut box with a layer of Decoart media fluid Paynes Grey and added a layer of weathered wood medium.
 Through a TCW stencil I sponged on some Decoart metalic gold. I splattered on some white paint to create a snowy atmosphere. Once dry I constructed the box with double sided tape. I had already prepared some dictionary pages using the Decoart reds and a Tim Holtz stencil. I applied these to the bottom of my box using Matt medium. Using Canvas Corp papers I cut out some triangles to turn into christmas trees. I added some liquid pearls to my little trees, some ribbon and a sentiment to the lid of my box.