About Me

My photo
Hi I'm Clare, I live in the South West of England in the seaside town of Torquay. I adore playing with inks, paints and generally getting messy. It is the calm place which fits in between my hectic life whilst working as an outreach support worker, looking after my son, daughter, foster son and hubby. Not forgetting our gorgeous springer spaniel, Suzi.

Monday, 4 December 2017

Hey Mr Snowman!

I'm over on the Topflight Stamps Blog today!.   The weather in the UK is certainly on the turn, with a light dusting of snow here and there!  So today I have brought to you my own zingy colourful snowman.


A few weeks back I pulled some prints from my gelli plate and had some clean up pages that I felt the need to keep.  Using Carabelle Studios Snowman set I stamped my snowman onto the printed page.


I masked off the snowman and stamped the houses & Christmas lights into the background.  Using distress oxide inks I used the snowflake stamp and some other stamps to build up some more layers.  I added a little shading around Mr Snowman, using a black inktense pencil, to make him pop!


I cut a clean piece of card as some white snowy ground for my snowman to sit and attached it over the printed card.  From some pink card stock I die cut the sentiment 'Celebrate' and attached.


Happy crafting,

Clare.


Friday, 1 December 2017

Mixed Media Monthly Challenge #43 Believe


A new month, a new challenge...Christmas challenge, 'Believe'.  It's our Christmas challenge at Mixed Media Monthly Challenge and time to get your mixed media all Christmassy!


Our sponsor this month is the lovely Glenda from Boozy Bear.  She makes a wonderful selection of chipboard shapes and textures.


I didn't use all of what Glenda sent to me but I had a good go!  


I started off by painting and brayering onto an MDF panel using a selection of Paperartsy fresco chalk paints.  With a stencil and a snowflake stamp I gradually built up my layers until I was happy.


With corresponding colours I painted the snowflakes and the chipboard punched circles.  I found the MDF heart my stash of bits and bobs, layered it up with paint using stencils and then gave it a fine coat of the chalk paint, just enough so the stencilling could show through.  I stamped on the sentiment and heat embossed with EP.


I attached all the separate painted elements using Finnabair 3D Matte Gel (Translucent).  What will you make for this months challenge?  Head over to the Mixed Media Monthly Challenge, check out the rules and submit your entries.

Happy Christmas crafting!

Hugs,
Clare.


Wednesday, 15 November 2017

Visible Image & MMMC - Mid-Month Inspiration

Hi folks, there is still time to get your silhouette projects ready and entered into this months Mixed Media Monthly Challenge.  Visible Image are handing over a $50 gift certificate to spend in their store.

Working on tags I put down a layer of white acrylic paint through the fibres stencil.  Once dry I continued to layer with Distress Oxides.  I stamped on The Happy Girl from the 'Tomorrow doesn't Exist' set.  I love the way the fibres stencil makes an appearance through the girl.


So 'Just be Happy' and pop your entry on the Mixed Media Monthly Challenge Blog before the end of the month.

Happy Crafting,
Clare


Sunday, 5 November 2017

Paperartsy Rust!

I'm thrilled to be over on the Paperartsy Blog  to share with you what I created for this months Topic#15...Rust!


For this Project I used Paperartsy/Tracy Scott Set #11 along with; Paperartsy Fresco acrylics, Rusting powder, Distress Inks & oxide inks and rusting paste from Prima, Finnabair Art Extravagence range.


My other little tool was a piece of textured wallpaper to help me build up my layers. I discovered this from one of Seth Apters You Tube videos where he used wall paper to print.


I started off by painting a block of MDF (rescued from hubsters garage) with slate grey Fresco acrylic paint.  I added layers by painting onto the textured wall paper and pressing it onto the block.  If I wanted to add a bigger area, like the large turquoise part in the middle, I painted onto a piece of plain card and pressed it on to break the pattern.


I got to this point and decided to stamp on some of the smaller stamps into the background but then I thought  that the pink was too bright for this project so I repeated with the wallpaper printing using Blood Orange to warm it up and give it a more autumnal feel.  I then repeated background stamping as most of the previous had been covered up.  I also stamped in various places with the wallpaper using versamark, sprinkled with rust powder and sprayed with white vinegar to activate the powder.

Here you can see where the rust powder has given an earthy, speckled effect.


I stamped the butterfly & flowers onto a sheet of card that had been prepared with Rusty Hinge Distress Ink and Peacock Feathers Distress Oxides.  I used a sepia ink pad and embossed with clear EP, I repeated with EP so that the butterfly had a little more texture.


I cut a fine metal bracket from my stash in half and fixed both of them to the block along with the butterfly, flowers and circles.


I used the rust pastes around the outside of my project, on the brackets and on selected areas of the flowers and butterfly.


Thank you for stopping by my blog today, I hope you have enjoyed your visit?

Crafty hugs,

Clare


Wednesday, 1 November 2017

Mixed Media Monthly Challenge #42 Silhouette

Hi bloggers, There's a new challenge over Mixed Media Monthly Challenge and this month the theme is 'Silhoette'.  Our sponsor for this month is 'Visible Image' and there is a gift certificate of £40 for our lucky prize winner.  Our guest designer this month is Tenia Nelson.


I had a fabulous selection of stamps & a stencil to work with all I had to do now was to work out how I was going to use them.


I started of by inking my with Antique Linen oxide ink by dipping it into the surface. and added in some stamping of the same colour using the larger circle from the ripple effect stamp.


I added another layer of colour, now using peacock feathers oxides, and more stamping in the corresponding colour.  Using some white cloud blending ink and the fibres stencil I went over chosen areas of the card.

Using the jumping girl from 'Tomorrow Doesn't Exist'  I stamped first with abandoned coral oxides, dried it off and then shifted my stamp over and stamped with black versafine. I added some more stamping using the circles and added some of my own doodles.  I edged the card using a brayer and some black paint to create a frame.  To tie everything together using the open circles I stamped over with white paint.


For the sentiment I stamped onto some card and blended over some Antique linen distress ink, cut out and applied to my card.  I created the shadows using a black Neocolour II  water soluble crayon.

Thank you for stopping by, come back soon.

Crafty hugs,
Clare.


Saturday, 7 October 2017

Happy World Card Making Day!

Happy Weekend to you all!  This is just a quick post to Celebrate World Card making Day.  I made a little something in advance of the day to be shown on Topflight Stamps.


If you head over to the Topflight Stamps Blog you can find out how to enter the World Card making Day Contest and be in with a chance of winning one of a few fabulous prizes!


Go get your craft on and celebrate World Card Making Day!

Happy Crafting,

Clare


Sunday, 1 October 2017

Mixed Media Monthly Challenge #41 Colour Challenge

Its the 1st of the month and there is a new challenge over at Mixed Media Monthly Challenge!  This month there is a colour challenge and we have a bright zingy pallet for you to work with.


Our generous sponsors this month are Rubber Dance Stamps and they are offering a gift certificate to one lucky winner!


I decided to play along this month using Distress Oxides, owing to the fact that I had just recently received the second set of twelve and the colours fell right into this months challenge!


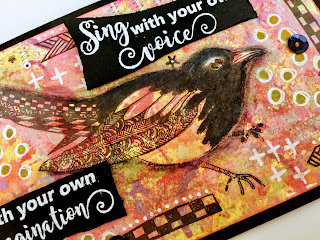
I created my tag by dipping my tag into spritzed Oxides before stamping on the 'Merry Magpie'


I added some shadow behind the Magpie as I wanted the colours on his body to pop through!


Along with the cute little arrows, stars and blocks, which were included in the set, I added my own doodles using a white Sharpie.  I stamped one of the sentiments onto some black card, heat embossed with white powder, distressed the edges and attached to the tag.


This is how I played along with this months challenge, now it's your turn!.  Head over to the Mixed Media Monthly Challenge Blog, check out the rules and submit your entry!

Happy Crafting,

Clare


Monday, 25 September 2017

Step by step 'Bloom' canvas

Hi I'm back again and I just wanted to share with you how I made this canvas using stamps from Topflight Stamps.  Now this post is going to be very picture heavy as I took lots of different  stage photos as the canvas evolved.


I started of with a 6 x 6 canvas and covered it with tissue paper, very wrinkled, using matt medium.


Next I covered the whole canvas using black gesso.


Then I started to add colour by dry brushing onto the canvas.


 Putting paint directly onto the canvas now, I wiped back through a stencil using a wet wipe.


Stamping onto more tissue paper with black ink, I heat embossed with clear embossing powder and carefully tore around the flower and sentiment.


I applied the flower  and sentiment to the canvas with matt medium.


I hope you have enjoyed your visit to my blog today?  All comments are gratefully received.

Crafty hugs,

Clare x x x