About Me

My photo
Hi I'm Clare, I live in the South West of England in the seaside town of Torquay. I adore playing with inks, paints and generally getting messy. It is the calm place which fits in between my hectic life whilst working as an outreach support worker, looking after my son, daughter, foster son and hubby. Not forgetting our gorgeous springer spaniel, Suzi.

Sunday, 24 July 2016

Oodles of doodles!

Hi folks, no smonday feeling for me tonight, it's the start of the summer holidays,  time to kick back and relax!  After suffering withdrawal from my craft room I managed to skip back in there today to finish a project that I had started three weeks ago.


I've been avidly following the wanderlust projects and this particular canvas was inspired by Magda Polakow.  She creates amazing whimsical art and also designs stamps for Stampotique.

 
On canvas I collaged  scraps of paper before painting with Dina Wakely acrylics and Posca paint pens.  I drew my little owl character, painted with gesso and added watery colours with inktence pencils.  The flowers were made from a previously painted piece of deli paper.


I really enjoyed creating this project, the whole process was very therapeutic.  Now what crafty mayhem will I cause next?  I have a couple of ideas on the boil but before then the craft room needs a tidy....so I can make another arty mess.

That's all from me tonight but I look forward to sharing some more of my makes with  you over the coming weeks.

Crafty hugs,

Clare X X X 

Thursday, 14 July 2016

I'm up on Paperartsy 3UP!

Good evening folks, as you can imagine I was uber excited to find out that I was to be included in Paperartsy's  3UP project.  When the stamps arrived I could hardly contain my excitement and I set about planning my project.  The challenge was to use JoFy stamps along with inks.  Using JoFy's stamps are never a chore more of a joy and I'm always thrilled with the crisp clear stamping that the stamps produce.


I decided for this project that I wanted to work on a small box canvas.  Read on to find out how I created my mini canvas of blooms and flutters!


I started of by applying some torn dictionary pages, I then scrapped some gesso over the canvas to leave behind some texture.


I applied my chosen colours of distress inks to the canvas using a blending tool.  Peacock feathers is one of my favourite distress ink colours.


Through a JoFy stencil I scraped through some grunge paste to give the canvas some more background layers.


I stamped the dandilion heads from set #38 with clear watermark ink and heat embossed with holographic embossing powder.


To the grunge paste dandies I added some aquamarine Treasured gold and later added some dots using a white pen.


With the canvas set aside I stamped the images onto watercolour card and some old dictionary pages and  heat embossed with embossing powder.  I watercoloured the plump blooms with seedless preserves Distress Inks and fussy cut around them ready to sit on the canvas.


The dragonfly, from set #13, was stamped first onto a dictionary page and heat embossed with holographic embossing powder and then onto some watercolour card.  I water coloured with seedless preserves.  The wings were fussy cut and applied to the dictionary dragonfly.  He looks as though he may flutter off the canvas!

Remember to pop over to the Paperartsy blog where you will find two more fabulous projects using the wonderful JoFy stamps!

Thank you for taking the time to stop by I love to hear your comments and thoughts on my project.  If you have enjoyed your visit feel free to follow and see what I get up to next.

Happy crafting,
Clare x x x 

Friday, 1 July 2016

I am proud to announce........


Hi guys,  this is so exciting!  I'm here today to let you all know that I have been invited on to the Design Team for The Mixed Media monthly challenge!

The Mixed Media Monthly Challenge offer you monthly, themed challenges and guest designer. There are some amazing prizes available each month.

So without further ado let me tell you about this months challenge.  The theme for this month is 'Reach for the Stars'. This months guest designer is no other than Seth Apter!

Let me share with you my creation for this months starry themed challenge.


Using my Dina Wakely heavy body acrylics I put down a base colour onto my blank canvas using lime and white.  Using an old credit card I put down an assortment of black lines around the picture.  With some die cut stars to use as a mask. I placed them on the canvas and using Tim Holtz stripes stencil I applied some texture paste and removed the masks.  I added some smaller stars from a Dylusions stencil by drawing these.  


Once the paste had dried I went back to my Dina paints I used turquoise, lime and umber to blend over the top of my previous layer but leaving the original colour peeping through the stars.  


I stamped in the voided stars with Seth Apters star stamp and heat embossed with frosted embossing powder.  I added some walnut distress inks so that you could see the wonderful detail from the stamp.  


I wanted one of my large stars to have a bit more dimension so with a couple of layers of hard board I die cut a star and glued them together.  I covered in tissue paper and spritzed with Dylusions turquoise ink.  Once dried I stamped Seth's star stamp once again with black ink and once again heat embossed.  Using some more Dylusions stencils (dots & alphabet). I sponged over the stencils with a mixture ofwhite and turquoise paint.  For the finishing touches I added in some shadows around my stars with a black inktence pencil and some white doodles with a Posca pen.


Thank you for stopping by today.   Remember to pop over to The Mixed Media Monthly challenge blog  to check out the challenge rules  and submit your entries.  The star that  I have used in this project is included in this months prize!


Crafty hugs,

Clare x x x 


Saturday, 25 June 2016

Having a cracking time!


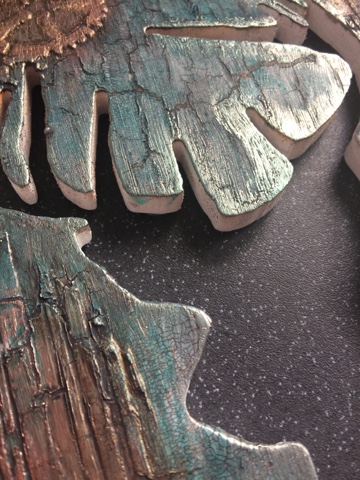
Hi, it's Clare here with a quick little post for the weekend.  As some of you may know I have been following the wanderlust project and recently Andy Skinner did a fabulous project so using his fabulous techniques and some decoart products I had a go at creating my own crackle effect art.


This was a mirror from that famous Swedish furniture store.  Using texture paste I scraped over the mirror and stamped into the paste.  Once dried I was able to paint and apply these gorgeous products such as antiquing cream and interference paint. 


This project was a plaque that was on sale at Sainsbury.  Using texture paste and decoart's crackle paste I built up the layers, added some paint and finished with some antiquing cream.


Thank you for stopping by today.  I'll be back soon and have some exciting news to share with you.  I hope you have enjoyed your visit?  Remember you can leave your comments below.

Crafty hugs,

Clare X X X 

Friday, 10 June 2016

Bubbles time!


Good afternoon bloggers, I hope you are well and looking forward to the weekend?  I wanted to share today's canvas with you.  Last year I made a birthday card for my mum very similar to this.  A friend of mine spotted it and asked me to recreate it on a canvas using a different colour scheme.


Here is how I made my butterfly bubbles.  I first sprayed my canvas through the TCW microbial stencil with some goosebumps.  Once dried I sprayed with Dylusion inks funky fushia and bubblegum pink and chased them around with a can of compressed air (you can do this with a straw but this is the easy option to save hyperventilating)


Lots of drying time required in this project, thankfully it is warm at the moment and I didnt have to wait too long.  Once the ink had dried I needed to seal in the inks so that it didn't start to move around when I started to paint.  I gave a couple of coats of clear spray matt sealer and...you got it more drying time.

Time to draw in the bubbles, once drawn i painted them with 3 shades of Paperartsy paints orchid, sherbet and snowflake.  When the paint had dried I was able to use my Neocolour II crayons to add more depth to the bubbles.

Through the TCW tiny circles stencil I added some white and black dots around, in and out the  bubbles.  When these had dried I stamped on my image which is the Indigoblu butterfly.  I heat embossed with clear powder.   I painted the flutterby with some mica powders and blending solution.


I hope that you have enjoyed your visit today?  If you have feel free to leave a comment below or follow by pressing one of the follow buttons above.

Happy crafting,
Clare x x x x

Tuesday, 7 June 2016

A little me time!

Two week half terms are definately the way forward!  I had a week off last week and was able to enjoy the sunshine and some quality time with my daughter.  Sophie has returned to school this week. Will, my son, is back at college and hubby is at work.  What is a girl to do with herself?  Well I embarked on a project for me!


As some of you already know I started the background for my canvas on Sunday afternoon, painting outside, in the shade, enjoying peace and quiet (and the tranquil sounds of next doors water feature).  Fully equipt with a handful of stencils and my Dylusions paints I set about mark making with  my glorious array of colours.


So over the duration of the last couple of days, my bloom began to grow, and grow!


Using Neocolour II crayons I outlined my bloom and blended with a paintbrush.


With some shadows behind, my bloom had flourished and is now wating for hubby to hang in the living room.  This certainly is the the biggest project I have ever attempted, I'm sure it won't be the last either.  

If you have enjoyed your visit today I'd love to hear your thoughts and comments and if you fancy another visit remember to hit the follow button above.

That's all from me for today, stop by again soon.

Crafty hugs,
Clare x x x 

Sunday, 15 May 2016

A little journal time

Well it's been a little while since I put something on my blog page so I thought I'd better do something about it!

 
After visiting a local craft show and struggling to get back due to bad traffic I was craving to get into my craft room and have a play with some of my new goodies.


I used Dylusion paints to put down a background and then smoothed some texture paste through a stencil.  I continued to add layers of paint until I was happy with my page.  Through the Tim Holtz splotches stencil I blended on some Inka Gold paint and also added some to my textured circles.

I added a little bit of background stamping using stamps from the Tim Holtz sideshow set and the sentiment Leave a little sparke from the handwritten set.

I'm so pleased that I managed to find some crafty time this weekend.  Thank you for stopping by.

Crafty hugs,
Clare X X X